In a previous post, I provided iBatis configuration and mapping that supported populating Java objects on a per-property basis, i.e. the classes in use had to provide setters for this approach. Here I describe another iBatis pattern that populates immutable objects with more than a few properties.
Thursday, December 16, 2010
Populate Immutable Objects with iBatis Mapping
Notes on the Builder Pattern
This post simply describes the Builder Pattern, for my own future reference. This pattern is useful in constructing immutable objects that have numerous properties, some required and some optional, without using numerous constructors to support various permutations. And, of course, since the object is immutable, there are no setters or non-private fields to support post-construction alterations. With the Builder pattern, one can ensure objects are not only immutable, but have completed state initialization before use.
Wednesday, November 17, 2010
Running an Effective Agile Retrospective
This is a summary of a presentation given by Brad Swanson of Propero Solutions on November 9, 2010, with permission from Brad. The topic was around effectively leading an agile retrospective meeting.
Wednesday, November 3, 2010
Features Gained with SOAP UI Pro Version
This documents differences between the free and Pro version of SOAP UI, as determined solely from browsing the SOAP UI website. This might be useful in determining if the free 14-day trial of the Pro version is worth your time.
Monday, October 25, 2010
Specify Database Connection via Maven Resource Filtering
This is an example usage of Maven's resource filtering facility. While Paolo Predonzani's excellent article got me pointed in the right direction, it didn't quite work out for me. Here is what I did to get what I needed.
Friday, October 1, 2010
Basic GWT-RPC Application
After stepping through this introduction to a simple GWT-RPC example, I had to experiment a bit to (1) get it running and (2) get some clarity around the naming hooks. What I'll present here is my own variation on that article's code examples, and the understanding I gained around what to keep straight around the names of the various classes and files.
Tip on Specifying GWT-RPC Remote Service Relative Path
Robert Hanson's excellent introduction to a GWT-RPC application got me started, but I bumped into this:
com.google.gwt.user.client.rpc.StatusCodeException:
HTTP ERROR: 404

NOT_FOUND

RequestURI=/relative-path
Thursday, August 26, 2010
iBatis Mapping for One-to-Many Relationship
Perhaps you had a problem, like I did, understanding the iBatis writeup on loading complex collection properties, i.e. populating a list-based field in a domain object where that list is the many-side of a one-to-many relationship. I'll admit it took me a few iterations to totally grasp what was being said, so for my future reference and yours, I'll write down my notes here.
Monday, August 23, 2010
Monitor Changes to a File
There are undoubtedly many options out there for file-system change monitors - i.e. a component that will notify your Java object when a given file or directory has changed, among many others I'm sure: jnotify and jpathwatch, the latter of which is based on upcoming Java 7 NIO enhancements.
I gave jpathwatch a try recently, at a time when I was under a tight deadline and didn't want to reinvent a wheel. This presents a perfectly fine API that worked out quite well and quite quickly for me in my Windows environment, but alas when I deployed to Linux, I bumped into an unsatisfied link error. The problem was around libc.so.6 and GLIBC_2.4, and I gave it a reasonable first effort to try quickly finding the resolution - assuming I'd deployed incorrectly, or my Linux box was out of date, etc. It was neither of these - OK, in fairness, it could be an out-of-date Linux box, but my experiment was to just try it out on our customers' target system - and the same problem occurred. So out-of-date becomes a moot point.
As I mentioned, I was under a tight deadline, so I began some quick prototyping to see if I could reinvent something but without relying on native libraries (as jpathwatch did). That would give me the added advantage of a smaller runtime footprint, which was another customer requirement. Since we are really talking about an Observer pattern, here's how I started:
public interface FileChangeListener {

    void fileModified(String file);

    void fileDeleted(String file);

    void fileCreated(String file);
}
That specifies the observer. Here's a simple monitor interface:
public interface AbstractFileChangeMonitor {

    void watch(FileChangeListener listener, final String filename);
}
This one is a bit limited, since it supports just one listener (observer) for one file. But my goal is not (yet) to provide a full-featured framework - I just need to knock out the problem at hand without any gold-plating. I'm a firm believer in doing the least I have to for a given problem - first make it work, then make it fast, then extend it, ... etc., but only if subsequent steps are called for. In either event, here's an implementation of the monitor - this one polls the file in question to detect changes, running in a thread so the client process isn't blocked:
public class PollingFileChangeMonitor implements AbstractFileChangeMonitor
{
    private final Logger logger = LoggerFactory.getLogger(getClass().getSimpleName());
    private FileChangeListener listener;
    private boolean done;
    private Thread watch;
    private int pollingInterval;

    public PollingFileChangeMonitor(int interval) {
        pollingInterval = interval;
    }

    public void watch(FileChangeListener theListener, final String filename)
    {
        if (watch == null) {
            listener = theListener;
            watch = new Thread() {
                public void run() {
                    try  {
                        init(filename);
                    } catch (Exception e) {
                        throw new IllegalStateException(e);
                    }
                 }
             };
            watch.start();
        }
    }

    private void init(String filename) throws Exception
    {
        boolean exists = false;
        long modTime = -1;
        File file = new File(filename);
        if (file.exists())
        {
            exists = true;
            modTime = file.lastModified();
            logger.info("====> File '" + filename + "' exists; change monitor is running...");
        } else
        {
            logger.info("====> File '" + filename + "' does NOT exist; change monitor is running...");
        }

        while (!done) {
            try {
                watch.sleep(pollingInterval);
            } catch (InterruptedException e) {
                // ignore for now
            }

            if (!exists && file.exists()) {
                exists = true;
                logger.info("====> File '" + filename + "' has been created; notify listener...");
                listener.fileCreated(filename);
            } else if (exists && !file.exists())  {
                exists = false;
                logger.info("====> File '" + filename + "' has been deleted; notify listener...");
                listener.fileDeleted(filename);
            } else if (exists && file.exists()) {
                long timestamp = file.lastModified();
                if (timestamp > modTime) {
                    modTime = timestamp;
                    logger.info("====> File '" + filename + "' has been modified; notify listener...");
                    listener.fileModified(filename);
                }
            }
        }
    }
}
What the listener does when notified is not really important in the context of this post; it can be anything. While I've to a certain extent "reinvented" something here, I've gotten away from reliance on native code and the potential deployment headaches around that, I've reduced my runtime footprint, and for that matter I've solved the problem with about the same amount of code I needed for the boiler-plate suggested by jpathwatch.
Handling Partially Failed Transactions
Requirements for a web application I've developed include submitting a form that results in many database operations, including a mix-and-match of updates, inserts and deletes. Since there can be hundreds of such operations, my initial approach was to execute them in a single batch for a reasonable response time. Now, if what you want is fast execution and truly an all-or-nothing transactional behavior, using batch execution is a good idea. However, on iteration with my customers, the requirements evolved into something a bit more sophisticated: if any operations in the submitted set fails - e.g. attempting to insert a duplicate row with a unique index - we want all other operations to succeed, and we want to identify the operations that did not succeed.
What's I've described of course is not strictly "transactional" - i.e. the all-or-nothing constraint is not in play, but for the application's needs, this is perfectly acceptable. And since what I describe involves removing the batch execution, the overall set of operations will take longer to execute - but again, this is acceptable for the application's goals. You won't always find these trade-offs to be acceptable, but when you do, I'll describe one mechanism for making it work - my strategy includes the following:
1 - Execute the collection of operations in a single transaction, albeit without batch
2 - Catch and deal with exceptions around operations that fail
3 - Provide return values that includes lists of successes and failures
Here are some snippets that provides these things. I start with an enumeration of the operation types I care about:
One guideline from my Computer Science education that always stuck with me is "make it right first, then make it fast". The solution provided here is, as noted, not going to be as fast as batch execution - but it does meet the requirements correctly. If there is still a need to make it "faster", we could consider using an asynchronous API so that the response time from the user's point of view is improved. This type of approach is in fact used in many enterprise settings, leveraging so called BASE behavior instead of the traditional ACID approach.
What's I've described of course is not strictly "transactional" - i.e. the all-or-nothing constraint is not in play, but for the application's needs, this is perfectly acceptable. And since what I describe involves removing the batch execution, the overall set of operations will take longer to execute - but again, this is acceptable for the application's goals. You won't always find these trade-offs to be acceptable, but when you do, I'll describe one mechanism for making it work - my strategy includes the following:
1 - Execute the collection of operations in a single transaction, albeit without batch
2 - Catch and deal with exceptions around operations that fail
3 - Provide return values that includes lists of successes and failures
Here are some snippets that provides these things. I start with an enumeration of the operation types I care about:
private enum OP {add, update, delete}
Next I provide a result object that can be examined by the client to identify successes and failures. I use generics for type-safety - the Key and Value types represent your application-specific database key and object classes:public class OperationResult {
private Map<Key, Value> successes = new HashMap();
private Map<Key, Exception> failures = new HashMap();
public OperationResult(Map<Key, Value> succeeded, Map<Key, Value> failed) {
successes.putAll(succeeded != null? succeeded : new HashMap());
failures.putAll(failed != null ? failed : new HashMap());
}
public Map<Key, Value> getSuccesses() {
return successes;
}
public Map<Key, Exception> getFailures() {
return failures;
}
}
Finally I provide the workhorse method that executes all operations, capturing exception details in the face of any failures, and proceeding in either event so it can commit as many successes as possible. Due to the way this API is set up, clients can execute only one operation type at a time: private OperationResult execute(Map<Key, Value> map, String query, OP operation) {
Map<Key, Value> successes = new HashMap();
Map<Key, Exception> failures = new HashMap();
try {
try {
sqlMapClient.startTransaction();
} catch (SQLException e) {
throw new IllegalStateException("None of the operations succeeded - txn could not be started",
e);
}
for (Map.Entry<Key, Value> entry : map.entrySet()) {
try {
switch (operation) {
case add:
return sqlMapClient.add(query, entry.getValue()); break;
case update:
return sqlMapClient.update(query, entry.getValue()); break;
case delete:
return sqlMapClient.delete(query, entry.getKey()); break;
}
successes.put(entry.getKey(), entry.getValue());
} catch (Exception e) {
failures.put(entry.getKey(), e);
}
}
try {
sqlMapClient.commitTransaction();
} catch (SQLException e) {
throw new IllegalStateException("None of the operations succeeded - txn could not be committed",
e);
}
} finally {
try {
sqlMapClient.endTransaction();
} catch (SQLException e) {
throw new IllegalStateException("Problem ending the txn - you should check whether the operations succeeded or not",
e);
}
return new OperationResult(successes, failures);
}
}
I'm using iBatis 2.x, as you might be able to guess from the SQL Map Client reference; it is assumed that the client passes in the correct query ID for the given operation.One guideline from my Computer Science education that always stuck with me is "make it right first, then make it fast". The solution provided here is, as noted, not going to be as fast as batch execution - but it does meet the requirements correctly. If there is still a need to make it "faster", we could consider using an asynchronous API so that the response time from the user's point of view is improved. This type of approach is in fact used in many enterprise settings, leveraging so called BASE behavior instead of the traditional ACID approach.
Tuesday, August 10, 2010
Open a PDF Resource in Browser Tab
Though the title refers to a PDF, the MIME type of the resource is not crucial to this. My goal was to open a PDF file in a new browser tab, and with IceFaces I initially tried the outputResource widget. This seemed like the right way to go, and according to the TLD I should have been able to open the resource directly in the browser as opposed to simply downloading it - but I could not get that to work as expected.
Instead, I backed off to a more straightforward link approach, i.e. use of the outputLink control, as follows:
Instead, I backed off to a more straightforward link approach, i.e. use of the outputLink control, as follows:
<ice:form>
    <ice:outputLink value="doc/some-PDF-file.pdf"
                    target="_blank">
        <ice:outputText value="Open PDF"/>
    </ice:outputLink>
</ice:form>
The plain vanilla HTML is dirt-simple:<a target="_blank" href="doc/some-PDF-file.pdf">Open PDF</a>This assumes the "doc" directory location is under your webapp root context.
SELECT Menu Doesn't Grey-Out When Disabled in Firefox 3.6.8
The title of this post pretty much says it all, just in case you've been Google'ing it to find some kind of reference to this. Since I found nothing, and since I solved my problem by manually changing the background-color on my SELECT item, I write it up here.
The problem does not occur in Firefox 3.5.11, and only occurs in 3.6.8 when you specify the SIZE attribute in a SELECT menu with MULTIPLE selectable items. Leave off the SIZE attribute, and the desired greying-out happens just fine, albeit with a 20-item window into your menu items. If that's not acceptable, you can use some JavaScript to convince the menu to grey out and then come back to normal as you disable and enable it. For example, given some HTML that defines some menu items, which should be disabled when a given checkbox is selected:
The problem does not occur in Firefox 3.5.11, and only occurs in 3.6.8 when you specify the SIZE attribute in a SELECT menu with MULTIPLE selectable items. Leave off the SIZE attribute, and the desired greying-out happens just fine, albeit with a 20-item window into your menu items. If that's not acceptable, you can use some JavaScript to convince the menu to grey out and then come back to normal as you disable and enable it. For example, given some HTML that defines some menu items, which should be disabled when a given checkbox is selected:
<input type="checkbox" name="items" onclick="enableDisable(this, formname)" .../>
....
<select id="menu" multiple size="4">
....
</select>
...here's the JS that can be used:
function enableDisable(input, formName) {
    if (input.checked) {
        disable(formName);
    } else {
        enable(formName);
    }
}
function disable(theForm) {
    if (theForm.menu != null) {
        theForm.menu.disabled = true;
        // address the Firefox problem - grey it out manually:
        theForm.menu.style.backgroundColor="#DBDBDB";
    }
}
function enable(theForm)
{
    if (document.forms[theForm].menu != null) {
        document.forms[theForm].menu.disabled = false;
        // address the Firefox problem - reset to normal color, manually:
        document.forms[theForm].menu.style.backgroundColor="#FFFFFF";
    }
}
Disclaimer: As is typical with my code snippet posts, I've extracted the relevant statements from my production code, manually editing field names, method names, etc. to protect my client's IP. Since I've not taken the time to confirm the extracted code (I'm lazy, I'm too busy, it's left as a reader exercise, etc.), I can't guarantee that your copy-paste exercise will "just work" - but I do believe I've given you the basic building blocks to make it work for your application.Get Full Filepath from IceFaces Webapp
Just a quick little snippet - if you need the "real path" for a resource residing within your webapp directory tree, here's how I've done it in IceFaces:
My setting is with an exploded WAR - but if your webapp remains unexploded, here are some tips to get around that.
        FacesContext fc = FacesContext.getCurrentInstance();
        ExternalContext ec = fc.getExternalContext();
        ServletContext servletCtx = (ServletContext)ec.getContext();
        String filePath = servletCtx.getRealPath("/directory-under-webapp-root/somefile.pdf");
In principle the same idea applies regardless of IceFaces or any other web framework - you just need to get the ServletContext. That said, it appears that J2EE servers are not required to return anything beyond null from the getRealPath method.My setting is with an exploded WAR - but if your webapp remains unexploded, here are some tips to get around that.
Wednesday, July 28, 2010
Log SQL Statements with iBatis
Here's what I've done to enable logging of SQL statements in an iBatis context. This adds to the various bits of advice I've found on the web.
Perhaps it's due to the environment I'm using (Java 1.6, iBatis 2.3.4, SLF4J 1.5.11, Log4J 1.2.15), but the guidance offered in the iBatis Dev Guide is, in my experience, not quite right. In fairness, something must have changed since last I tried that advice (was I using Java 1.5 back then? I'm not sure), since, as I recall, it resulted in the SQL logging I needed. However, at the moment I find that simply configuring this:
On target is the advice given in the Apache Bookstore, i.e. to specify this:
In either event, here are some SQL-interceptor tools recommended by various posts (though I've yet to try either one):
p6spy: http://www.p6spy.com/
jdbcdslog: http://code.google.com/p/jdbcdslog/
And here are all the web references I used for this post:
Stack Overflow:
http://stackoverflow.com/questions/3014318/how-to-do-ibatis-version-of-show-sql
http://stackoverflow.com/questions/2635058/ibatis-get-executed-sql
Apache Bookstore: http://www.apachebookstore.com/confluence/oss/display/IBATIS/How+do+I+get+SqlMapClient+to+log+SQL+statements
iBatis Dev Guide: http://ibatisnet.sourceforge.net/DevGuide.html#d0e2600
Perhaps it's due to the environment I'm using (Java 1.6, iBatis 2.3.4, SLF4J 1.5.11, Log4J 1.2.15), but the guidance offered in the iBatis Dev Guide is, in my experience, not quite right. In fairness, something must have changed since last I tried that advice (was I using Java 1.5 back then? I'm not sure), since, as I recall, it resulted in the SQL logging I needed. However, at the moment I find that simply configuring this:
<logger name="java.sql.PreparedStatement">
    <level value="debug"/>
</logger>
...yields no SQL output at all. On target is the advice given in the Apache Bookstore, i.e. to specify this:
<logger name="java.sql">
    <level value="debug"/>
</logger>
This yields all of connection information, prepared statements, values inserted as prepared statement parameters and result sets, something like this:Connection
{conn-100008} Preparing Statement: select name, description from mytable where name like ?
{pstm-100009} Executing Statement: select name, description from mytable where name like ?
{pstm-100009} Parameters: [name%]
{pstm-100009} Types: []
{rset-100010} ResultSet
{rset-100010} Header: [NAME, DESCRIPTION]
{rset-100010} Result: [name2, Desc for name2]
{rset-100010} Result: [name3, Desc for name3]
You'll possibly get even more output, depending on your app - since the java.sql namespace is more than just these things. If this is a concern, use the following: <logger name="java.sql.Connection">
<level value="debug"/>
</logger>
<logger name="java.sql.PreparedStatement">
<level value="debug"/>
</logger>
<logger name="java.sql.ResultSet">
<level value="debug"/>
</logger>
I've personally found that the output from PreparedStatement and ResultSet are the most useful - but omitting Connection appears to preclude these log statements from appearing. The Connection logger also appears to control the output level of PreparedStatement and ResultSet - i.e., setting Connection to INFO results in zero output from any of them. I begin to suspect that Connection has a parent relationship to the other two; perhaps this is what's changed since last I did this.In either event, here are some SQL-interceptor tools recommended by various posts (though I've yet to try either one):
p6spy: http://www.p6spy.com/
jdbcdslog: http://code.google.com/p/jdbcdslog/
And here are all the web references I used for this post:
Stack Overflow:
http://stackoverflow.com/questions/3014318/how-to-do-ibatis-version-of-show-sql
http://stackoverflow.com/questions/2635058/ibatis-get-executed-sql
Apache Bookstore: http://www.apachebookstore.com/confluence/oss/display/IBATIS/How+do+I+get+SqlMapClient+to+log+SQL+statements
iBatis Dev Guide: http://ibatisnet.sourceforge.net/DevGuide.html#d0e2600
Tuesday, July 27, 2010
Generic Conversion Between List<T> and String
Here's a reusable generic "converter" interface for converting between comma-separated strings and Lists of a given type:
/**
 * Converts between comma-separated string and lists of type T.
 */
public abstract class AbstractConverter<T> {

    protected abstract T getInstance(String s);

    /**
     * Converts a list of items into a comma-separated string
     */
    public String toString(List<T> items)
    {
        String s= "";
        String comma = "";
        for (T item : items) {
            s += comma + item;
            comma = ",";
        }
        return s;
    }

    /**
     * Converts a comma-separated string into a list of items.
     */
    public List<T> toList(String csv)
    {
        if (csv == null)
        {
            return new ArrayList<T>();
        }

        String[] items = csv.split(",");
        List<T> theList = new ArrayList<T>();
        for (String item : items) {
            T thisItem = getInstance(item);
            theList.add(thisItem);
        }
        return theList;
    }

    /**
     * Converts a comma-separated string into a list of items, excluding any items in the given
     * exclude list.
     */
    public List<T> toList(String csv, List<T> excludes)
    {
        if (csv == null)
        {
            return new ArrayList<T>();
        }

        String[] items = csv.split(",");
        List<T> theList = new ArrayList();
        for (String item : items) {
            T thisItem = getInstance(item);
            if (!excludes.contains(thisItem))
            {
                theList.add(thisItem);
            }
        }
        return theList;
    }
}
I can now provide concrete converter classes of types as needed, for example:
/**
 * Converts between comma-separated string and lists of MyType objects.
 */
public class MyConverter extends AbstractConverter<MyType> {

    // provide an instance of the custom type
    protected MyType getInstance(String s)
    {
        return new MyType(s);
    }

    // optionally enforce a singleton, if needed
    private MyConverter() {
        // EMPTY
    }

    // provide a convenience for static utility classes
    private static AbstractConverter<MyType> cvt = new MyConverter();
    public static AbstractConverter<MyType> inst()
    {
        return cvt;
    }
}
Since I want to make things convenient for clients of this, I now provide a static utility class that precludes the need to instantiate anything:
public class MyHelper {

    private static AbstractConverter cvt = MyConverter.inst();

    public static String toString(List<MyType> items)
    {
        return cvt.toString(items);
    }

    public static List<MyType> toList(String csv)
    {
        return cvt.toList(csv);
    }

    public static List<MyType> toList(String csv, List<MyType> excludes)
    {
        return cvt.toList(csv, excludes);
    }
}
Now my clients can call e.g. MyHelper.toList("x, y, z") instead of MyConverter.inst().toList("x, y, z"). A small advantage, but it does help with readability and reinforces the notion that this is a collection of utility functions.
Friday, July 23, 2010
When Log4j Logs Messages Twice...
Since my Google'ing only gave me a clue instead of the complete answer on this one, I post it here for future reference.
When a given logger in a log4j configuration is outputting messages twice to your appender, you might try adding the additivity attribute as a fix:
Same idea for logger or for category. From the DTD (I'm using version 1.2.15):
This worked for me. As you can see, the additivity defaults to true. There may be other fixes, but I didn't dig any further after fixing my problem.
When a given logger in a log4j configuration is outputting messages twice to your appender, you might try adding the additivity attribute as a fix:
<logger name="myLogger" additivity="false">
    <level value="info"/>
    <appender-ref ref="myFile"/>
</logger>
Same idea for logger or for category. From the DTD (I'm using version 1.2.15):
<!ELEMENT category (param*,(priority|level)?,appender-ref*)>
<!ATTLIST category
  class         CDATA   #IMPLIED
  name  CDATA #REQUIRED
  additivity (true|false) "true"
>

<!ELEMENT logger (level?,appender-ref*)>
<!ATTLIST logger
  name  CDATA #REQUIRED
  additivity (true|false) "true"
>
This worked for me. As you can see, the additivity defaults to true. There may be other fixes, but I didn't dig any further after fixing my problem.
Thursday, July 22, 2010
Determine Which Row is Selected in a JSF Table
Let's say you have a JSF table with numerous rows, and that when one of them is "selected" you'd like to know which one it is. Let's assume a JSF event is fired off when you click on the row, resulting in a callback to your application. In this callback, you want to determine the identity of the row in a way that correlates to your application, such that you can proceed with whatever action is needed. Here's the sequence:
- Table is constructed with rows representing application objects A, B and C
- User clicks somewhere in row B, e.g. in an input text box
- JSF event fires and your application is called back
- The application determines that B has been selected and processes that application object as needed
- Add a parameter to the UIComponent with the identity as needed
- Register an interest in the JSF event that will get fired when the UIComponent is selected
- Examine the event received in your application callback to find the UIParameter child
- Examine the UIParameter to extract the identity of the row
<ice:dataTable
     var="thisRow"
     value="#{app.allRows}"
    ....
>
....
    <ice:inputText valueChangeListener="#{app.callback}">
        <f:param name="name" value="#{thisRow.id}"/>
    </ice:inputText>
....
</ice:dataTable>
Here are steps #3 and #4, the application callback:public void callback(ValueChangeEvent event) {
for (UIComponent child : event.getComponent().getChildren()) {
if (child instanceof UIParameter) {
UIParameter param = (UIParameter) child;
if ("name".equals(param.getName())) {
String thisID = (String)param.getValue();
if (thisID.equals(theIDofInterest)) {
// process as needed
}
}
}
}
Tuesday, July 20, 2010
Using JSF Conversion with Custom Objects
My goal is to provide a user-facing input text box that accepts a comma-separated list of values, and converts these to an application-specific object. Since I'm using JSF, I'll take advantage of their built-in conversion facility - but I want to remain as decoupled from JSF as possible. This means I'll implement their Converter class, but I'll do so only with very minimal high-level business logic (as opposed to emulating their example usage in the JEE Tutorial example). That way, I can reuse my conversion logic in other frameworks, for other clients, etc.
My application object is a collection of name objects. The name objects look something like this:
The collection object uses the Java List to wrap the name objects:
Lots of moving parts are needed when working with JSF. But, the more I can encapsulate, the less it will cost to migrate to a different web framework down the road.
My application object is a collection of name objects. The name objects look something like this:
public class MyName {

    private String name;

    public MyName(String name) {
        this.name = name;
    }

    public String getName() {
        return name;
    }

    public void setName(String name) {
        this.name = name;
    }

    public boolean equals(Object obj) {
        if (null == obj) {
            return true;
        }

        if ((obj == null) || (getClass() != obj.getClass())) {
            return false;
        }

        MyName other = (MyName) obj;
        return new EqualsBuilder().append(this.name, other.name).isEquals();
    }

    public int hashCode() {
        return new HashCodeBuilder(3, 13).append(this.name).toHashCode();
    }

    public String toString() {
        return name;
    }
}
Note that I've implemented toString as well as the equals and hashCode methods. The builder classes are provided by Apache Commons Lang; I've blogged about them here.The collection object uses the Java List to wrap the name objects:
public class MyNameList {

    private List<MyName> names = new ArrayList<MyName>();

    public MyNameList (List<MyName> names) {
        setNames(names);
    }

    public static MyNameList getInstance(String csv) {
        if (csv == null) {
            return new MyNameList();
        }
        String[] names = csv.split(",");
        List<MyName> nameList = new ArrayList();
        for (String name : names) {
            nameList.add(new MyName(name));
        }
        return new MyNameList(nameList );
    }

    public List<MyName> getNames() {
        return names;
    }

    public void setNames(List<MyName> names) {
        this.names = names;
    }

    public String toString() {
        StringBuffer sb = new StringBuffer();
        String comma = "";
        for (MyName name: names) {
            sb.append(comma).append(name);
            comma = ",";
        }
        return sb.toString();
    }
}
Here's what the JSF converter implementation might look like - there's not much there, as planned:public class MyNameListConverter implements Converter {
public Object getAsObject(FacesContext context,
UIComponent component, String newValue)
throws ConverterException {
return MyNameList.getInstance(newValue);
}
public String getAsString(FacesContext context,
UIComponent component, Object value)
throws ConverterException {
return value == null? "" : value.toString();
}
}
I must register the converter with JSF:<converter>
<description>
Converter for CSV list of name values
</description>
<converter-id>MyNameListConverter</converter-id>
<converter-class>
com.mybiz.MyNameListConverter
</converter-class>
</converter>
Finally I reference the converter in my JSF page: <ice:inputText id="nameValues" partialSubmit="true"
converter="MyNameListConverter"
value="#{bean.nameList}"/>
Lots of moving parts are needed when working with JSF. But, the more I can encapsulate, the less it will cost to migrate to a different web framework down the road.
Monday, July 19, 2010
What Database Am I Connecting To?
If you run your functional tests in different environments (your local box, the nightly build, etc.), in addition to running your components in a production setting, you might want to get feedback at startup time around just what database you're connecting to. Since I was recently bit by nightly tests that were wiping out my development-local database tables - since I'd hardwired the connection URL - I was motivated to put this kind of feedback in place. Here are some details around how I did this.
Our nightly build has certain environment variables set:
To simulate this environment, I set these same variables in my shell (Unix, Cygwin, ...), changing the values as needed to facilitate connecting to my local database. Next I set up a property configuration in my Spring startup file that uses these variables, replacing things per the environment:
Our nightly build has certain environment variables set:
dbip=BuildHost

dbinstance=TestDatabase

dbuser=username

dbpass=password
To simulate this environment, I set these same variables in my shell (Unix, Cygwin, ...), changing the values as needed to facilitate connecting to my local database. Next I set up a property configuration in my Spring startup file that uses these variables, replacing things per the environment:
    <bean class="org.springframework.beans.factory.config.PropertyPlaceholderConfigurer">
        <property name="properties">
            <value>
                database.driver=oracle.jdbc.OracleDriver
                database.url=jdbc:oracle:thin:@//${dbip}:1521/${dbinstance}
                database.user=${dbuser}
                database.password=${dbpass}
            </value>
        </property>
    </bean>
These Spring-generated properties are used to create a data source, which is used to configure an iBatis SQLMapClient, which I then use in my DAO: <bean id="dataSource" class="org.apache.commons.dbcp.BasicDataSource"
destroy-method="close">
<property name="driverClassName" value="${database.driver}"/>
<property name="url" value="${database.url}"/>
<property name="username" value="${database.user}"/>
<property name="password" value="${database.password}"/>
</bean>
....
<bean id="sqlMapClient" class="org.springframework.orm.ibatis.SqlMapClientFactoryBean">
<property name="configLocation" value="classpath:SqlMapConfig.xml"/>
<property name="dataSource" ref="dataSource"/>
</bean>
....
<bean id="ibatisDao" class="com.mybiz.resource.db.ibatis.IbatisDao">
<property name="sqlMapClient" ref="sqlMapClient"/>
</bean>
The DAO implements ApplicationContextAware so that it can examine the Spring context, in particular the properties of interest in the data source:public class MyDao implements ApplicationContextAware
{
private ApplicationContext context;
public void setApplicationContext(ApplicationContext ctx)
{
context = ctx;
dumpDataSource(ctx);
}
public void dumpDataSource(ApplicationContext ctx)
{
BasicDataSource dataSource = ctx.getBean(BasicDataSource.class);
logger.info("============>>> Data Source: " + dataSource.getUrl()
+ " (user " + dataSource.getUsername() + ")");
}
}
Finally, I get myself into the habit of looking for that log output at the start of my test runs to be sure I'm connecting to the expected database. Once burned, twice shy.Friday, July 16, 2010
JEE Authentication: Login Errors, Roles, Access Denied, and Logout
In a previous post around LDAP authentication using Jetty, I had some unfinished business. Here I'll deal with login errors, restrict the login to a given role, deal with subsequent access denied scenarios, display the currently logged-in user name, and provide log-out functionality.
The web.xml I'd started with already specified a login-error page, but I was simply pointing it to the same page as the login form. This results in that page simply refreshing without any indication to the user of why that happened. What we want is some kind of message displayed that indicates the given username or password was not valid.
Now, I could simply copy the login.jsp to another JSP, say login-error.jsp, add a message to that page and alter the web.xml to specify that new page on login error:
Displaying the current username is a simple matter of leveraging the built-in getRemoteUser(), provided by HttpServletRequest. Since, after logging in, I've transitioned into a JSF application - and because I'm adverse to using JSP scriptlets to accomplish use of that getter once I'm in JSF - I simply provide a getter in one of my JSF managed beans that fetches the HTTP request and returns the user name:
User: #{svh.userName}
Finally, I'll provide log-out functionality. First, a command link (done with the IceFaces framework):
The web.xml I'd started with already specified a login-error page, but I was simply pointing it to the same page as the login form. This results in that page simply refreshing without any indication to the user of why that happened. What we want is some kind of message displayed that indicates the given username or password was not valid.
Now, I could simply copy the login.jsp to another JSP, say login-error.jsp, add a message to that page and alter the web.xml to specify that new page on login error:
<login-config>
    <auth-method>FORM</auth-method>
    <realm-name>ldap</realm-name>
    <form-login-config>
        <form-login-page>/faces/login/login.jsp</form-login-page>
        <form-error-page>/faces/login/login-error.jsp</form-error-page>
    </form-login-config>
</login-config>
But now both login.jsp and login-error.jsp contain the same FORM snippet. Now if I next want to specify yet another login page to which the user is directed on an "access denied" error (which we'll deal with momentarily), and I'm still afflicted with copy-paste fever, I'll have the same login form in three places. Let's factor it out instead into a JSP snippet named loginform.jsp:<form method=post action="j_security_check">
<label for="j_username" style="font-weight:bold">Username</label>
<input type="text" name="j_username" id="j_username" style="margin-left:10px"/>
<label for="j_password" style="font-weight:bold">Password</label>
<input type="password" name="j_password" id="j_password" style="margin-left:10px"/>
<input type="submit" value="Log In"/>
</form>
The usual login page now looks like this:<div style="margin-top:25px; margin-left:25%">
<h2 style="text-decoration:underline; color:blue;margin-left:-10px">Management App</h2>
<h3>Please Log In</h3>
<%@include file="loginform.jsp"%>
</div>
And I'll provide an "access denied" page that looks like this:<div style="margin-top:25px; margin-left:25%">
<h2 style="text-decoration:underline; color:blue;margin-left:-10px">Management App</h2>
<h3>Please Log In</h3>
<div style="color:red;font-weight:bold;">Authentication failed. User is not in Required Role.</div>
<%@include file="loginform.jsp"%>
</div>
Configuring HTTP-403 responses (i.e. access denied) to navigate to this page is done like so:<error-page>
<error-code>403</error-code>
<location>/login/accessDenied.jsp</location>
</error-page>
Access denied problems will occur if a given user is not in the expected role. So far, the web.xml has granted authorization to all roles by virtue of the wild-card for the role-name. We can restrict that by naming a role instead:<security-constraint>
<web-resource-collection>
<web-resource-name>Protected Resources</web-resource-name>
<url-pattern>*.iface</url-pattern>
</web-resource-collection>
<auth-constraint>
<role-name>admin</role-name>
</auth-constraint>
<user-data-constraint>
<transport-guarantee>
CONFIDENTIAL
</transport-guarantee>
</user-data-constraint>
</security-constraint>
Now, once a user provides his/her credentials at the login form, these are first checked by the LDAP module (configured as a Jetty realm, as per the previous post); if those are valid, the user is next confirmed to be assigned the admin role. If that is the case, all is well and navigation will proceed as configured by the JSF navigation rule (again, please see the previous post). If the credentials are not valid, the user will be redirected to the login-error page, this time with an informative error message about the login problem. If the credentials are good but the user is not assigned the admin role, the user will be redirected to the access-denied page, again with a informative message.Displaying the current username is a simple matter of leveraging the built-in getRemoteUser(), provided by HttpServletRequest. Since, after logging in, I've transitioned into a JSF application - and because I'm adverse to using JSP scriptlets to accomplish use of that getter once I'm in JSF - I simply provide a getter in one of my JSF managed beans that fetches the HTTP request and returns the user name:
public String getUserName() {
    return getServletRequest().getRemoteUser();
}
...referencing it, as usual, with the JSF expression language:User: #{svh.userName}
Finally, I'll provide log-out functionality. First, a command link (done with the IceFaces framework):
<ice:commandLink
    action="logout" immediate="true" value="Logout"
    style="margin-left:5px;color:blue;font-size:medium"/>
The logout action is mapped with a navigation rule:<navigation-rule>
<description>Logout</description>
<from-view-id>/*</from-view-id>
<navigation-case>
<from-outcome>logout</from-outcome>
<to-view-id>/login/logout.jsp</to-view-id>
<redirect/>
</navigation-case>
</navigation-rule>
...taking us to the logout.jsp page, which invalidates the session and invites the user to log back in:<% session.invalidate(); %>
<div style="margin-top:5px; margin-left:25%">
<h2 style="text-decoration:underline; color:blue;margin-left:-10px">Management App</h2>
<h3>Logout Succeeded</h3>
<p>
You are now logged out of the Management UI.
</p>
<a href="/index.jsp" style="text-decoration:underline">Return to Login page.</a>
</div>
The index.jsp redirects to the application's JSF-based home page:<html>
<head>
<title>Management UI</title>
</head>
<body>
<%
String redirectURL = "./index.iface";
response.sendRedirect(redirectURL);
%>
</body>
</html>
And, as mentioned in the first post, all iface resources are protected by a security constraint, so this will redirect to the login page.Wednesday, July 14, 2010
LDAP Authentication with Jetty
If you noticed nothing else but the titles of my last two posts, you might suspect that I went down the Spring-Security road and back-pedaled to a standard JAAS approach. You would be correct.
As it turned out - to my surprise and with great disappointment - I found Spring Security to be impenetrable. Now, Spring makes a lot of things in my life easier, and in fact that's the only reason I use it. But when it becomes a tangled snarl of undocumented opaqueness, and especially when I read that even an expert in Acegi had trouble with it (see the Wrap-Up in that article), I decide to find another way.
Here are my basic building blocks for a JAAS approach with a JSF application in Jetty. First, I configure my web.xml with an authorization constraint:
In either event, the Jetty realm configuration references a LoginModuleName of "ldapmodule", and as per standard JAAS, this configuration is captured in a file (in my case, a file named ./etc/ldap.conf) referenced by the JVM argument -Djava.security.auth.login.config=etc/ldap.conf. That file is basically a replica of the ldaploginmodule example in the Jetty tutorial (again, except for the package name of the LdapLoginModule class), configured of course with the proper schema references and credentials for my LDAP environment.
Finally, I configure a navigation rule so JSF will take me to my target page after successful login:
As it turned out - to my surprise and with great disappointment - I found Spring Security to be impenetrable. Now, Spring makes a lot of things in my life easier, and in fact that's the only reason I use it. But when it becomes a tangled snarl of undocumented opaqueness, and especially when I read that even an expert in Acegi had trouble with it (see the Wrap-Up in that article), I decide to find another way.
Here are my basic building blocks for a JAAS approach with a JSF application in Jetty. First, I configure my web.xml with an authorization constraint:
    <security-constraint>
        <web-resource-collection>
            <web-resource-name>Protected Resources</web-resource-name>
            <url-pattern>*.iface</url-pattern>
        </web-resource-collection>
        <auth-constraint>
            <role-name>*</role-name>
        </auth-constraint>
        <user-data-constraint>
            <transport-guarantee>
                CONFIDENTIAL
            </transport-guarantee>
        </user-data-constraint>
    </security-constraint>
My web.xml has already mapped an IceFaces PersistentFacesServlet to *.iface, so that's what the URL pattern is about. My initial naive attempt was to use a URL pattern of /*, but that's much too broad - it will preclude e.g. loading image resources as part of your login page. That login page is also configured in the web.xml: <login-config>
<auth-method>FORM</auth-method>
<realm-name>ldap</realm-name>
<form-login-config>
<form-login-page>/faces/login/login.jsp</form-login-page>
<form-error-page>/faces/login/login.jsp</form-error-page>
</form-login-config>
</login-config>
The login page (./login/login.jsp) is dirt-simple so far. I'm only working on basic functionality at this point, and there's nothing pretty about it: <form method=post action="j_security_check">
<label for="j_username">Username</label>
<input type="text" name="j_username" id="j_username"/>
<br/>
<label for="j_password">Password</label>
<input type="password" name="j_password" id="j_password"/>
<br/>
<input type="submit" value="Login"/>
</form>
The realm-name portion in the web.xml references the container environment; configuring the realm is delegated to the container in JEE. My container is (embedded) Jetty, and I configure the Jetty realm via a simple entry in my jetty.xml file: <Call name="addUserRealm">
<Arg>
<New class="org.mortbay.jetty.plus.jaas.JAASUserRealm">
<Set name="name">ldap</Set>
<Set name="LoginModuleName">ldapmodule</Set>
</New>
</Arg>
</Call>
By the way, I followed the Jetty tutorial on JAAS to make all of this happen. My previous post mentioned a gotcha in that article around the LDAP Login Module package name. Depending on which version of Jetty you're using, you may need to make the change discussed there.In either event, the Jetty realm configuration references a LoginModuleName of "ldapmodule", and as per standard JAAS, this configuration is captured in a file (in my case, a file named ./etc/ldap.conf) referenced by the JVM argument -Djava.security.auth.login.config=etc/ldap.conf. That file is basically a replica of the ldaploginmodule example in the Jetty tutorial (again, except for the package name of the LdapLoginModule class), configured of course with the proper schema references and credentials for my LDAP environment.
Finally, I configure a navigation rule so JSF will take me to my target page after successful login:
    <navigation-rule>
        <description>After Login</description>
        <from-view-id>/login/login.jsp</from-view-id>
        <navigation-case>
            <to-view-id>/index.jsp</to-view-id>
            <redirect/>
        </navigation-case>
    </navigation-rule>
Note that this a bare-bones scaffold for authentication. I have yet to deal with login failures, roles, JSF-messaging for the user, and the like.Tip: Package Name Correction for Jetty LdapLoginModule
If you're following the Jetty tutorial for establishing JAAS authentication, and you have copied the sample configuration file for the LDAP module, you may come across this error message after you enter your username and password on your login page:
The reason is that, at least for the version of Jetty I'm using (6.1.21), the package name has changed to org.mortbay.jetty.plus.jaas.ldap.LdapLoginModule. Make that change in the ldaploginmodule sample in that tutorial and you'll solve this problem (assuming of course you have all the needed dependencies).
For your reference, here's the complete dependency list I'm using for a JSF-based app running with embedded Jetty 6.1.21:
javax.security.auth.login.LoginException: unable to find LoginModule class: org.mortbay.jetty.plus.jaas.spi.LdapLoginModule
The reason is that, at least for the version of Jetty I'm using (6.1.21), the package name has changed to org.mortbay.jetty.plus.jaas.ldap.LdapLoginModule. Make that change in the ldaploginmodule sample in that tutorial and you'll solve this problem (assuming of course you have all the needed dependencies).
For your reference, here's the complete dependency list I'm using for a JSF-based app running with embedded Jetty 6.1.21:
        <dependency>
            <groupId>org.mortbay.jetty</groupId>
            <artifactId>jetty</artifactId>
            <version>${jettyVersion}</version>
        </dependency>

        <dependency>
            <groupId>org.mortbay.jetty</groupId>
            <artifactId>jetty-util</artifactId>
            <version>${jettyVersion}</version>
        </dependency>

        <dependency>
            <groupId>org.mortbay.jetty</groupId>
            <artifactId>jsp-2.1-jetty</artifactId>
            <version>${jettyVersion}</version>
        </dependency>

        <dependency>
            <groupId>org.mortbay.jetty</groupId>
            <artifactId>jetty-plus</artifactId>
            <version>${jettyVersion}</version>
        </dependency>

        <dependency>
            <groupId>org.mortbay.jetty</groupId>
            <artifactId>jetty-ldap-jaas</artifactId>
            <version>${jettyVersion}</version>
        </dependency>
Tip: Provide the Spring Security NamespaceHandler Explicitly
If you're working with Spring Security, you might start your pom with an entry like so:
Unable to locate Spring NamespaceHandler for XML schema namespace [http://www.springframework.org/schema/security]
After a fair amount of Google'ing and Stack-Overflow'ing, I found the problem - and I reproduce it here to save myself (and hopefully you) the headache next time around: there is a dependency missing that looks like this:
Now you should be good to go.
<dependency>
    <groupId>org.springframework.security</groupId>
    <artifactId>spring-security-web</artifactId>
    <version>3.0.0.RELEASE</version>
</dependency>
This will bring in the spring-web, spring-security-core and commons-logging artifacts, and I would not fault you for thinking you're good to go. You're possibly following this tutorial or another among the many out there, and are providing a Spring config that references the http://www.springframework.org/schema/security namespace - and, at least for me, here's where things did not go as expected. At runtime, the error message I received was this:Unable to locate Spring NamespaceHandler for XML schema namespace [http://www.springframework.org/schema/security]
After a fair amount of Google'ing and Stack-Overflow'ing, I found the problem - and I reproduce it here to save myself (and hopefully you) the headache next time around: there is a dependency missing that looks like this:
<dependency>
    <groupId>org.springframework.security</groupId>
    <artifactId>spring-security-config</artifactId>
    <version>3.0.0.RELEASE</version>
 </dependency>
Now you should be good to go.
Friday, July 2, 2010
Using JDK keytool To Generate Keys and Certs
In a previous post, I stepped through use of IBM's KeyMan GUI to generate SSL keys and certificates, placing them in KeyMan's "token", or as more commonly known, a keystore. I then attempted to use this keystore in both a Windows and Linux deployment of my webapp, and met with mixed success - since I used the Windows version of the KeyMan tool, this worked out OK for the Windows webapp, but not so much for the Linux deployment.
My subsequent attempts to use KeyMan's Unix shell script (km) instead - under a Cygwin environment - were much the same: on deployment, an "Invalid keystore format" exception was issued. Clearly, this is about the difference between DOS and Unix file formats. The next obvious step was to simply execute the km script directly under Linux, foregoing any file encoding or translation issues that might be happening with Cygwin. Here, however, after appearing to generate the key pair, the KeyMan GUI went into some kind of blocking wait - or maybe an infinite loop? a deadlock? There was no way to tell; the GUI simply became unresponsive. Followup exercises to include setting KM_HOME in the environment, unpacking the native library support ZIP file and setting the LD_LIBRARY_PATH to point to them, and etc. all proved fruitless.
Finally, I reverted to using the JDK keytool utility, and - no surprise - this works out just fine in both Windows and Linux (i.e. in terms of generating a keystore that is recognized by the webserver). Here is the script I use to generate things, in both Linux and Cygwin:
If you bump into this error message in the generate step:
...you'll want to make sure you didn't embed any commas or other special characters in the values you provide. For example, I started out with an Organizational Unit (OU) of 'My Biz, Inc.' - but that provoked the error message. Embedded dashes and periods are apparently OK, but note that I've enclosed any values with embedded spaces in single quotes. That's more a shell issue than a keytool problem.
If you bump into an error message something like this, in the print-certificate step:
...you might be trying to pass in the entire keystore to the printcert command; that's why I export the certificate first in the script above, using just that piece as the argument to print it out.
My subsequent attempts to use KeyMan's Unix shell script (km) instead - under a Cygwin environment - were much the same: on deployment, an "Invalid keystore format" exception was issued. Clearly, this is about the difference between DOS and Unix file formats. The next obvious step was to simply execute the km script directly under Linux, foregoing any file encoding or translation issues that might be happening with Cygwin. Here, however, after appearing to generate the key pair, the KeyMan GUI went into some kind of blocking wait - or maybe an infinite loop? a deadlock? There was no way to tell; the GUI simply became unresponsive. Followup exercises to include setting KM_HOME in the environment, unpacking the native library support ZIP file and setting the LD_LIBRARY_PATH to point to them, and etc. all proved fruitless.
Finally, I reverted to using the JDK keytool utility, and - no surprise - this works out just fine in both Windows and Linux (i.e. in terms of generating a keystore that is recognized by the webserver). Here is the script I use to generate things, in both Linux and Cygwin:
######################################

#

#  generate-keystore.sh - Generate key and certificate

#

######################################


CN=MyKeystore

OU='Web - Development'

ORG='My Biz Inc.'

COUNTRY=US

ALIAS=MyBizKeystore

PASS=password

KEYSTORE=keystore

CERTFILE=cert

EXPIRY=730


# remove it if it's there

[ -f "$KEYSTORE" ] && /bin/rm $KEYSTORE


# generate the keystore with a self-signed cert and an RSA keypair

$JAVA_HOME/jre/bin/keytool -genkeypair -keyalg RSA \

-dname "cn=$CN, ou=$OU, o=$ORG, c=$COUNTRY" \

-alias $ALIAS -keypass $PASS -keystore $KEYSTORE \

-storepass $PASS -validity $EXPIRY


# export the certificate so we can look at it

$JAVA_HOME/jre/bin/keytool -exportcert -alias $ALIAS -file $CERTFILE -keystore $KEYSTORE -storepass $PASS


# print the certificate

$JAVA_HOME/jre/bin/keytool -printcert -file $CERTFILE
If you bump into this error message in the generate step:
Incorrect AVA format
...you'll want to make sure you didn't embed any commas or other special characters in the values you provide. For example, I started out with an Organizational Unit (OU) of 'My Biz, Inc.' - but that provoked the error message. Embedded dashes and periods are apparently OK, but note that I've enclosed any values with embedded spaces in single quotes. That's more a shell issue than a keytool problem.
If you bump into an error message something like this, in the print-certificate step:
lengthTag=109, too big
...you might be trying to pass in the entire keystore to the printcert command; that's why I export the certificate first in the script above, using just that piece as the argument to print it out.
Wednesday, June 30, 2010
Using KeyMan To Generate Keys and Certs
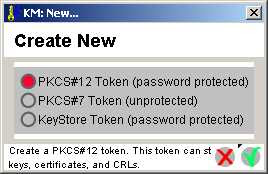
This post continues my series around Jetty. Previous posts discuss setting up a basic embedded Jetty application, and then some adjustments to repeat that exercise in a Cygwin environment. My next step is to configure SSL...now, I recall earlier adventures using Java's keytool to manage this, and have hoped for something better. Jetty's documentation pointed me to KeyMan, which is by far a nicer way to go - it provides a decent intuitive GUI to help create, delete, and otherwise manage keys and certificates, among other things. Here's an outline of how to use KeyMan to create a PKCS#12 keystore with a self-signed certificate and public-private key pair:


Next, I'll see about using that keystore for my Jetty SSL setup. Meanwhile, here are some useful links around KeyMan, SSL and Jetty's SSL instructions:
Solaris Keytool: http://java.sun.com/j2se/1.4.2/docs/tooldocs/solaris/keytool.html
Windows Keytool: http://java.sun.com/j2se/1.4.2/docs/tooldocs/windows/keytool.html
KeyMan: http://www.alphaworks.ibm.com/tech/keyman
OpenSSL: http://www.openssl.org/docs/HOWTO/
OpenSSL FAQ: http://www.openssl.org/support/faq.html
Jetty SSL: http://docs.codehaus.org/display/JETTY/How+to+configure+SSL
- Download, install (unpack zip, etc.), read the README.txt. I did nothing with the km.setup file, but did edit the km.bat as instructed. Turns out that, since I'm on cygwin, that wasn't needed; instead, I execute the km program. Click on the "New" icon to create a new "token" (i.e. repository for keys, certs, etc.):

- Choose the PKCS#12 Token from the next dialog, and hit the checkmark ("Complete Dialog") to proceed:

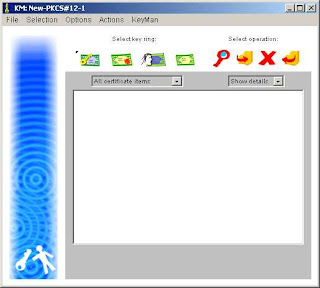
- Next, you need to store a key and a certificate in this token. Select "Actions -> Generate Key" from the token management window that appears:

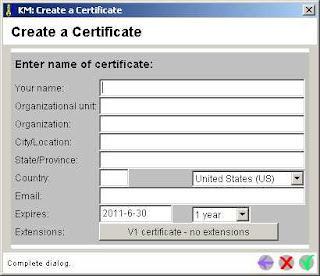
- The default algorithm is RSA-1024; that's strong enough for my needs. Click the Complete Dialog checkmark...this takes a second to complete, offering a cool little progress bar while you wait. The new key shows up in the All Certificate Items viewport of the token management window; now we need a certificate to go with it. Click "Actions -> Create Certificate...". Self-signed is good enough for my needs. Click checkmark and fill in the fields as needed (only "Your name" is required):

- A verification appears when you check "Complete Dialog" here, with the option to label this certificate. Enter a label if you wish, and again move on with the checkmark:

- Save the token to a file by selecting File -> Save. This first prompts you for a passphrase, then a file location.
Next, I'll see about using that keystore for my Jetty SSL setup. Meanwhile, here are some useful links around KeyMan, SSL and Jetty's SSL instructions:
Solaris Keytool: http://java.sun.com/j2se/1.4.2/docs/tooldocs/solaris/keytool.html
Windows Keytool: http://java.sun.com/j2se/1.4.2/docs/tooldocs/windows/keytool.html
KeyMan: http://www.alphaworks.ibm.com/tech/keyman
OpenSSL: http://www.openssl.org/docs/HOWTO/
OpenSSL FAQ: http://www.openssl.org/support/faq.html
Jetty SSL: http://docs.codehaus.org/display/JETTY/How+to+configure+SSL
Followup: Basic Embedded Jetty in Cygwin
In a recent post, I described how to get a basic Jetty web application going, using the embedded approach. Since then, I've reproduced it in a Cygwin environment, and here I'll comment on that exercise.
As it turns out, specifying this type of Java startup in Cygwin (or in Windows XP per se) will not work:
That's because the wild-card expression apparently is not supported in a DOS-based environment - even if I enclose the above classpath in quotes. Instead, I'd need to provide a semi-colon-delimited list (not colon-separated - I'm in XP) of all jars under ./WEB-INF/lib. This is not the kind of thing I'd like to do; maintaining that kind of list would be a headache as the webapp evolves. Additionally, keep in mind that I've told Jetty to start up with an exploded warfile location:
This will result in a web-level classloader to load all the jars under WEB-INF/lib, which is arguably redundant, since I'm explicitly setting my classpath to the same thing. That in turn will cause loader constraint violations when running the webapp in an IDE such as Intellij, if the run configuration you're using there points to the same classpath (since that application-level classloader loads the classes first, and then the webapp-level classloader tries to do the same thing). I'll defer solving the Intellij problem for now, and just address basic command line startup.
Given maintenance cost concerns, I'm motivated to load the minimal number of jars needed to get Jetty going, then allow it to load the rest of what it needs from WEB-INF/lib. In my particular setup, that minimal set includes my application jar and three Jetty jars:
I figured out this minimal set by just trying to start up the WebServer class and seeing what classdef-not-found problems I had - then searching for the necessary jar by setting up a bash function that I can reuse:
...and subsequently invoking it like this:
Once I have all my dependencies figured out, I can invoke my Jetty program with that minimal set, and rely on the webapp-level classloader to do the rest when the embedded Jetty webserver starts:
Note that I've wrapped the classpath in quotes, and, as mentioned, used semi-colons instead of colons.
As it turns out, specifying this type of Java startup in Cygwin (or in Windows XP per se) will not work:
java -server -Dbasedir=/usr/local/mywebapp/war -cp /usr/local/mywebapp/war/WEB-INF/lib/* com.mybiz.MyJettyWebServer
That's because the wild-card expression apparently is not supported in a DOS-based environment - even if I enclose the above classpath in quotes. Instead, I'd need to provide a semi-colon-delimited list (not colon-separated - I'm in XP) of all jars under ./WEB-INF/lib. This is not the kind of thing I'd like to do; maintaining that kind of list would be a headache as the webapp evolves. Additionally, keep in mind that I've told Jetty to start up with an exploded warfile location:
        WebAppContext appContext = new WebAppContext();
        File warPath = new File(System.getProperty("basedir"));
        appContext.setWar(warPath.getAbsolutePath());
        HandlerList handlers = new HandlerList();
        handlers.setHandlers(new Handler[]{ appContext, new DefaultHandler() });
        jetty.setHandler(handlers);
        jetty.start();
This will result in a web-level classloader to load all the jars under WEB-INF/lib, which is arguably redundant, since I'm explicitly setting my classpath to the same thing. That in turn will cause loader constraint violations when running the webapp in an IDE such as Intellij, if the run configuration you're using there points to the same classpath (since that application-level classloader loads the classes first, and then the webapp-level classloader tries to do the same thing). I'll defer solving the Intellij problem for now, and just address basic command line startup.
Given maintenance cost concerns, I'm motivated to load the minimal number of jars needed to get Jetty going, then allow it to load the rest of what it needs from WEB-INF/lib. In my particular setup, that minimal set includes my application jar and three Jetty jars:
MyApp-1.0.jar

jetty-6.1.21.jar

jetty-util-6.1.21.jar

servlet-api-2.5-20081211.jar
I figured out this minimal set by just trying to start up the WebServer class and seeing what classdef-not-found problems I had - then searching for the necessary jar by setting up a bash function that I can reuse:
findclass () { find . -name '*.jar' -o -type f |xargs -i bash -c "jar -tvf {}| tr / . | grep -i "$@" && echo {}"; }
...and subsequently invoking it like this:
findclass <dot-delimited-classname>
Once I have all my dependencies figured out, I can invoke my Jetty program with that minimal set, and rely on the webapp-level classloader to do the rest when the embedded Jetty webserver starts:
java -server -Dbasedir=/usr/local/mywebapp/war -cp "MyApp-1.0.jar;jetty-6.1.21.jar;jetty-util-6.1.21.jar;servlet-api-2.5-20081211.jar" com.mybiz.MyJettyWebServer
Note that I've wrapped the classpath in quotes, and, as mentioned, used semi-colons instead of colons.
Wednesday, June 23, 2010
Send/Receive Notification About an Exception
From Java Message Service, Second Edition, by Mark Richards, Richard Monson-Haefel, and David A. Chappell - here's a lightweight mechanism for notifying interested consumers about an exception (in a JMS context):
Interested consumers can receive this notification like this:
This uses a simple Message object, which contains no payload - only JMS headers and properties. As noted in the book, when simple notification is all that is needed, use of the Message type is the most efficient means to do this.
try {
    ...
} catch (Exception up) {
    Message message = session.createMessage();
    message.setStringProperty("Exception", up.getMessage());
    publisher.publish(message);
    throw up;
}
Interested consumers can receive this notification like this:
public void onMessage(Message message) {
    System.out.println("Exception: " + message.getStringProperty());
}
This uses a simple Message object, which contains no payload - only JMS headers and properties. As noted in the book, when simple notification is all that is needed, use of the Message type is the most efficient means to do this.
Basic Embedded Jetty Setup: JSF 1.2 Webapp
Here are some basic code snippets I've used (to-date ... subject to change) to get an IceFaces-based (JSF 1.2) webapp deployed as an embedded Jetty webapp - using Maven for building. The artifacts include a configuration file, a minimal bootstrap class, the pom and the file used as the maven assembly-plugin descriptor.
The configuration file is jetty.xml, and doesn't require much. It lives under the ./etc directory of my project:
This configuration file is referenced by the bootstrap class, using it to configure Jetty. This class also sets the context for the webapp, points to the top-level directory of the exploded WAR content, sets a webapp context and a default context as handlers for Jetty, and starts up the webserver:
The pom specifies IceFaces 1.8.2, being careful to exclude the EL API jar wherever that's brought in transitively, as per http://www.icefaces.org/docs/v1_8_0/htmlguide/devguide/appendixA.html; and it specifies Jetty and Log4J artifacts. Note that JSP support is explicitly specified:
The assembly-plugin descriptor has a few things worth mentioning. In the dependency sets, I lay down my dependencies in the standard webapp location, ./WEB-INF/lib:
I also specify several destinations for my dev-time files to deal with Jetty-related stuff:
Finally, to start the program:
Browse to localhost:8080 and your webapp should appear.
You'll notice I did not use the maven-jetty plugin (nor the jetty-maven plugin - yes, there are two different ones, each with different names, schemas and behaviors). The good news about the plugin is that it shields you from much of the configuration/deployment exercises you'll need; that's also the bad news. I needed to understand explicitly what dependencies, etc. I'd need for production, so I chose to do things manually. The good news around this is that I've done most of the heavy lifting to grease the skids for future embedded-Jetty exercises.
References
Jetty 6.x Wiki
Jetty 7x, 8.x Wiki
The configuration file is jetty.xml, and doesn't require much. It lives under the ./etc directory of my project:
<!DOCTYPE Configure PUBLIC "-//Mort Bay Consulting//DTD Configure//EN" "http://jetty.mortbay.org/configure.dtd">

<Configure id="Server" class="org.mortbay.jetty.Server">

    <Set name="ThreadPool">
        <New class="org.mortbay.thread.QueuedThreadPool">
            <!-- initial threads set to 10 -->
            <Set name="minThreads">10</Set>
            <!-- the thread pool will grow only up to 200 -->
            <Set name="maxThreads">200</Set>
            <!-- indicates that having 20 and below, the pool will be considered low on threads -->
            <Set name="lowThreads">20</Set>
            <!-- The number of queued jobs (or idle threads) needed before the thread pool is grown (or shrunk) -->
            <Set name="SpawnOrShrinkAt">2</Set>
        </New>
    </Set>

    <Call name="addConnector">
        <Arg>
            <New class="org.mortbay.jetty.nio.SelectChannelConnector">
                <!-- the ip address or domain to bind -->
                <Set name="host">
                    <SystemProperty name="jetty.host"/>
                </Set>
                <!-- the port to use/bind, defaults to 8080 if property not set -->
                <Set name="port">
                    <SystemProperty name="jetty.port" default="8080"/>
                </Set>
                <!-- the time in milliseconds when a connection is considered idle -->
                <Set name="maxIdleTime">300000</Set>
                <!-- the number of acceptors (their job is to accept the connection and dispatch to thread pool) -->
                <Set name="Acceptors">2</Set>
                <!-- should the connection statistics be turned on? (Not advisable in production) -->
                <Set name="statsOn">false</Set>
                <!-- the confidential port -->
                <Set name="confidentialPort">8443</Set>
                <!-- indicates the minimum number of connections when the server is considered low on resources -->
                <Set name="lowResourcesConnections">5000</Set>
                <!-- when low on resources, this indicates the maximum time a connection must be idle to not be closed -->
                <Set name="lowResourcesMaxIdleTime">5000</Set>
            </New>
        </Arg>
    </Call>

    <!-- Stops the server when ctrl+c is pressed (registers to Runtime.addShutdownHook) -->
    <Set name="stopAtShutdown">true</Set>
    <!-- send the server version in the response header? -->
    <Set name="sendServerVersion">true</Set>
    <!-- send the date header in the response header? -->
    <Set name="sendDateHeader">true</Set>
    <!-- allows requests(prior to shutdown) to finish gracefully -->
    <Set name="gracefulShutdown">1000</Set>

</Configure>
This configuration file is referenced by the bootstrap class, using it to configure Jetty. This class also sets the context for the webapp, points to the top-level directory of the exploded WAR content, sets a webapp context and a default context as handlers for Jetty, and starts up the webserver:
public class MyJettyWebServer {

    public static void main(String[] args) throws Exception {

        Server jetty = new Server();

        // configure Jetty by pointing to config file(s)
        String[] configFiles = { "etc/jetty.xml" };
        for (String configFile : configFiles) {
            XmlConfiguration configuration = new XmlConfiguration(new File(configFile).toURI().toURL());
            configuration.configure(jetty);
        }

        // set the context for the webapp
        WebAppContext appContext = new WebAppContext();
        appContext.setContextPath("/mycontext");

        // point to the top-level directory of the exploded WAR content
        File warPath = new File(System.getProperty("basedir"));
        appContext.setWar(warPath.getAbsolutePath());

        // set a webapp context and a default context as handlers for Jetty
        HandlerList handlers = new HandlerList();
        handlers.setHandlers(new Handler[]{ appContext, new DefaultHandler() });
        jetty.setHandler(handlers);

        // start up the webserver
        jetty.start();
    }
}
The pom specifies IceFaces 1.8.2, being careful to exclude the EL API jar wherever that's brought in transitively, as per http://www.icefaces.org/docs/v1_8_0/htmlguide/devguide/appendixA.html; and it specifies Jetty and Log4J artifacts. Note that JSP support is explicitly specified:
    ....
    <!-- use JAR packaging for embedded Jetty -->
    <packaging>jar</packaging>
    ....
    <dependencies>
        <dependency>
        <dependency>
            <groupId>org.icefaces</groupId>
            <artifactId>icefaces</artifactId>
            <version>1.8.2</version>
            <exclusions>
                <exclusion>
                    <groupId>javax.el</groupId>
                    <artifactId>el-api</artifactId>
                </exclusion>
            </exclusions>
        </dependency>
        <dependency>
            <groupId>org.icefaces</groupId>
            <artifactId>icefaces-comps</artifactId>
            <version>1.8.2</version>
        </dependency>
        <dependency>
            <groupId>org.icefaces</groupId>
            <artifactId>icefaces-facelets</artifactId>
            <version>1.8.2</version>
            <exclusions>
                <exclusion>
                    <groupId>javax.el</groupId>
                    <artifactId>el-api</artifactId>
                </exclusion>
            </exclusions>
        </dependency>
        <dependency>
            <groupId>javax.faces</groupId>
            <artifactId>jsf-api</artifactId>
            <version>1.2_12</version>
        </dependency>
        <dependency>
            <groupId>javax.faces</groupId>
            <artifactId>jsf-impl</artifactId>
            <version>1.2_12</version>
        </dependency>
        <dependency>
            <groupId>org.mortbay.jetty</groupId>
            <artifactId>jetty</artifactId>
            <version>6.1.21</version>
        </dependency>
        <dependency>
            <groupId>org.mortbay.jetty</groupId>
            <artifactId>jetty-util</artifactId>
            <version>6.1.21</version>
        </dependency>
        <dependency>
            <groupId>org.mortbay.jetty</groupId>
            <artifactId>jsp-2.1-jetty</artifactId>
            <version>6.1.21</version>
        </dependency>
        <dependency>
            <groupId>log4j</groupId>
            <artifactId>log4j</artifactId>
            <version>${log4jVersion}</version>
        </dependency>
    </dependencies>
</project>
The assembly-plugin descriptor has a few things worth mentioning. In the dependency sets, I lay down my dependencies in the standard webapp location, ./WEB-INF/lib:
        <dependencySet>
            <unpack>false</unpack>
            <scope>runtime</scope>
            <outputDirectory>war/WEB-INF/lib</outputDirectory>
        </dependencySet>
I also specify several destinations for my dev-time files to deal with Jetty-related stuff:
        <!--
        Jetty deployment: configuration file location
        -->
        <fileSet>
            <directory>etc</directory>
            <outputDirectory>/usr/local/mywebapp/etc</outputDirectory>
            <fileMode>0644</fileMode>
        </fileSet>
        <!--
        Jetty deployment: webapp deployment location - hmmm, this one might not be needed...
        -->
        <fileSet>
            <directory>webapps</directory>
            <outputDirectory>/usr/local/mywebapp/webapps</outputDirectory>
            <fileMode>0644</fileMode>
        </fileSet>
        <!--
        Jetty deployment: production-time exploded warfile location
        -->
        <fileSet>
            <directory>src/main/webapp</directory>
            <outputDirectory>/usr/local/mywebapp/war</outputDirectory>
            <fileMode>0644</fileMode>
        </fileSet>
Finally, to start the program:
java -server -Dbasedir=/usr/local/mywebapp/war -cp /usr/local/mywebapp/war/WEB-INF/lib/* com.mybiz.MyJettyWebServer
Browse to localhost:8080 and your webapp should appear.
You'll notice I did not use the maven-jetty plugin (nor the jetty-maven plugin - yes, there are two different ones, each with different names, schemas and behaviors). The good news about the plugin is that it shields you from much of the configuration/deployment exercises you'll need; that's also the bad news. I needed to understand explicitly what dependencies, etc. I'd need for production, so I chose to do things manually. The good news around this is that I've done most of the heavy lifting to grease the skids for future embedded-Jetty exercises.
References
Jetty 6.x Wiki
Jetty 7x, 8.x Wiki
Tuesday, June 22, 2010
Ternary Expressions Problem with JSF 1.2
This is a followup on my previous post that offered a workaround to this error message, as seen when working with JSF 1.2:
In my first post, I failed to find the root cause, so I took the path of least resistance in the interest of the project schedule (using the heavy-handed approach of two separate panel groups, backing the condition out to the "rendered" attribute of each group). As it turns out, the root cause is lack of white space around the colon, as explained in this article from Oracle. That is, given an expression:
...and depending on what the deployment environment is, you'll either notice nothing or bump into this error message. When that first post was written, I was deploying to Glassfish 8.x - and I needed to use the workaround described above. Recently, I deployed to JBoss 4.x and later to 5.1, and here I did not notice anything - but then I redeployed to embedded Jetty 6.1.x, and the problem re-appeared. This is probably because JBoss shielded me from needing the magic combination of JSF, JSP, Facelets, JSTL and etc. to make things work, but vanilla Jetty does not.
In either event, you might have better luck than I with determining the dependency mix, including tweaking the web.xml to configure the correct expression factory, trying various permutations of Jetty's JSP libraries, and etc. (aka "time sink"); but, more simply, the fix is to change the problematic expression (well, actually it's a bug in JSF 1.2) to this:
This time, I googled for the right thing ("JSF 1.2 ternary parse exception") and, by now, the article from Oracle had finally been published (it wasn't there until after I originally bailed out with my workaround).
javax.el.ELException: Error Parsing:Caused by: com.sun.el.parser.ParseException: Encountered ":text"
In my first post, I failed to find the root cause, so I took the path of least resistance in the interest of the project schedule (using the heavy-handed approach of two separate panel groups, backing the condition out to the "rendered" attribute of each group). As it turns out, the root cause is lack of white space around the colon, as explained in this article from Oracle. That is, given an expression:
#{isThisTrue?doThis:doThat}
...and depending on what the deployment environment is, you'll either notice nothing or bump into this error message. When that first post was written, I was deploying to Glassfish 8.x - and I needed to use the workaround described above. Recently, I deployed to JBoss 4.x and later to 5.1, and here I did not notice anything - but then I redeployed to embedded Jetty 6.1.x, and the problem re-appeared. This is probably because JBoss shielded me from needing the magic combination of JSF, JSP, Facelets, JSTL and etc. to make things work, but vanilla Jetty does not.
In either event, you might have better luck than I with determining the dependency mix, including tweaking the web.xml to configure the correct expression factory, trying various permutations of Jetty's JSP libraries, and etc. (aka "time sink"); but, more simply, the fix is to change the problematic expression (well, actually it's a bug in JSF 1.2) to this:
#{isThisTrue?doThis : doThat}
This time, I googled for the right thing ("JSF 1.2 ternary parse exception") and, by now, the article from Oracle had finally been published (it wasn't there until after I originally bailed out with my workaround).
Monday, June 14, 2010
Blocking Sends When ActiveMQ Broker is Down
As it turns out, even though you may have specified useAsyncSend on an ActiveMQ broker, your sends will block if that broker goes down (or if the broker was not running when the client first attempts a send). Don't waste any cycles (like I did) tweaking the delivery mode, whether or not the session is transacted, or other connection settings - the "problem" will occur with use of the failover transport (i.e., my broker URL is failover://(tcp://localhost:61616)) . This transport will automatically attempt reconnection until success, but during these attempts, your client will block. This may not be the behavior you want; I'm not able just yet to give you a satisfying solution, but I can give you some hooks to come up with something on your own (and if so, please let me know!).
One so-called solution is of course to back off using the failover transport - e.g., use TCP instead. But this is heavy-handed and arguably overkill - the failover transport serves an excellent purpose in the face of broker failures, and I'm reluctant to let it go just to solve an exceptional condition. In either event, you'll receive something like a java.net.ConnectException with the TCP protocol when the broker is down; you can try-catch that and do whatever makes sense to you. But that's a questionable workaround. Instead, here's some advice from the ActiveMQ website:
Now, I first tried the timeout parameter approach - as it turns out, your application will get an exception at the timeout expiration. But this introduces its own problems around performance - if you have thousands (or, even dozens) or messages, each one timing out after say 2-3 seconds, your throughput will be hurt badly. So, I bailed out on this approach and took a closer look at the TransportListener. Here's what I implemented in my publisher class:
My test program received callbacks for all of these methods, as expected, except for the onException. The ActiveMQ javadocs aren't much help here ("An unrecoverable exception has occured on the transport"). From this point, I tried combining the timeout parameter with the transport callback - e.g.
My strategy here is to minimize the timeout, and hence maximize the throughput in the face of dozens of sends, by reducing the timeout to a bare minimum (and then restoring it to the original timeout value when the broker comes back up). But, I had no success here; the timeout remained at the original value as set in the URL (which I consider to be too high in this context) even after transportInterupted (allegedly) changed it. I'm not willing to set my initial timeout to a low value either, since this may cause exceptions even under nominal operating conditions - not good.
From here, I leave it to you to find some clever use of the transport listener that can deal with a broker that goes down. Good luck, and let me know.
One so-called solution is of course to back off using the failover transport - e.g., use TCP instead. But this is heavy-handed and arguably overkill - the failover transport serves an excellent purpose in the face of broker failures, and I'm reluctant to let it go just to solve an exceptional condition. In either event, you'll receive something like a java.net.ConnectException with the TCP protocol when the broker is down; you can try-catch that and do whatever makes sense to you. But that's a questionable workaround. Instead, here's some advice from the ActiveMQ website:
If you use failover, and a broker dies at some point, your sends will block by default. Using TransportListener can help with this regard. It is best to set the Listener directly on the ActiveMQConnectionFactory so that it is in place before any request that may require an network hop. Additionally you can use timeout option which will cause your current send to fail after specified timeout. The following URL, for example
failover:(tcp://primary:61616)?timeout=3000
will cause send to fail after 3 seconds if the connection isn't established. The connection will not be killed, so you can try sending messages later at some point using the same connection (presumably some of your brokers will be available again).
Now, I first tried the timeout parameter approach - as it turns out, your application will get an exception at the timeout expiration. But this introduces its own problems around performance - if you have thousands (or, even dozens) or messages, each one timing out after say 2-3 seconds, your throughput will be hurt badly. So, I bailed out on this approach and took a closer look at the TransportListener. Here's what I implemented in my publisher class:
    public void onCommand(Object command) { /* EMPTY */ }

    public void onException(IOException error)
    {    Logging.publisher.warn("Transport exception encountered", error);  }

    public void transportInterupted()
    {    Logging.publisher.warn("Transport interrupted! Is Broker down?");  }

    public void transportResumed()
    {    Logging.publisher.warn("Transport connectivity is restored");  }
My test program received callbacks for all of these methods, as expected, except for the onException. The ActiveMQ javadocs aren't much help here ("An unrecoverable exception has occured on the transport"). From this point, I tried combining the timeout parameter with the transport callback - e.g.
    public void transportInterupted()
    {    this.amqFactory.setSendTimeout(100); }

    public void transportResumed()
    {    this.amqFactory.setSendTimeout(-1); }
My strategy here is to minimize the timeout, and hence maximize the throughput in the face of dozens of sends, by reducing the timeout to a bare minimum (and then restoring it to the original timeout value when the broker comes back up). But, I had no success here; the timeout remained at the original value as set in the URL (which I consider to be too high in this context) even after transportInterupted (allegedly) changed it. I'm not willing to set my initial timeout to a low value either, since this may cause exceptions even under nominal operating conditions - not good.
From here, I leave it to you to find some clever use of the transport listener that can deal with a broker that goes down. Good luck, and let me know.
Friday, June 11, 2010
Preserve Unix Line Endings with Windows Intellij
Just a quick note: If you're editing shell scripts and the like on a Windows platform with Intellij (my version is 9.0), here's how I succeeded preserving Unix-style line endings. First, to more accurately describe the problem, a given file has been saved in the Windows IDE, then checked in to a Perforce repository, and then sync'd onto a Unix server. When editing that file with vi, the settings [dos] [noeol] appear - and I'd like to get rid of these. I do not want a DOS format, and I do want an end-of-line. Here are the steps I took:
Hope that helps. I'm sure I'll bump into this headache again, so I can also hope this helps me when that happens.
- First, set the Intellij "Line separator" property to Unix - enter "Line separator" in the Settings search box, then choose the Code Style - General result. The Line separator property is towards the bottom of that panel. Yes, it does state "for new files", and not surprisingly I did not succeed simply editing an existing file - the DOS-style format remained after I saved and checked it in (Perforce). But, this does cover things going forward - at least this gets rid of the [dos] problem on new files - however, on the subsequent edit of the new file on Unix, the [noeol] is still there.
- To get rid of the [noeol] problem, I set one more thing in Intellij: in IDE Settings - search for "Ensure blank", which will bring up the optional checkbox for "Ensure blank line before end of file on Save". Check that option, and from here it appears that newly created files in the IDE will no longer have the [noeol] affliction. To address this problem on existing files, simply edit/save/check-in the file with the IDE. Probably, you could also just add a blank line at the end with vi on Unix - I didn't try this, but it sounds reasonable.
- To fix the [dos] problem on existing files, open the file in vi and type ":set ff=unix". Save, check in, and this problem should not reappear even after subsequent edits in the Windows IDE.
Hope that helps. I'm sure I'll bump into this headache again, so I can also hope this helps me when that happens.
Friday, May 28, 2010
Get a Spring Aspect Working
After some time away from AOP, I've found myself forgetting the bare essentials of getting off the ground - i.e., what's the least I have to do just to prove that my aspect is getting invoked?
Assuming a Spring 3.0 environment, here is the summary:
Here's a simple Spring file, named spring-test-aspect.xml:
The aspect will automatically get Spring-managed since it uses the @Component annotation, and component scanning declared above includes its package. Use the same approach with your application object:
Filling in the method is irrelevant; all we're trying to do is prove that if that method is invoked, that the aspect will intercept the control flow afterwards. Here's a test case that does this for us:
There's the proof-of-concept; from here, you'd add real functionality to your application class and decorate that functionality with the aspect. I should offer a fair warning: the above snippets have not been actually compiled and run, rather simply copy-pasted with various names changed to be more general purpose (as such, it might not be totally correct). So, if you bump into any problems - you have my apologies, but I'm sure the problems will be trivial.
Assuming a Spring 3.0 environment, here is the summary:
- Create the aspect
- Create a Spring context file that declares AOP
- Use Spring to instantiate both the aspect and the application object
- Run your test case to prove it's working
package com.mybiz;
import org.aspectj.lang.annotation.Aspect;

@Aspect
@Component
public class MyAspect
{
    // Flag indicating that a given pointcut was in fact invoked.
    public boolean madeIntercept = false;

    @Pointcut("execution(* com.mybiz.MyApp.myMethod(..))")
    public void myMethodPointcut() {}

    @After("myMethodPointcut()")
    public void doSomething() { madeIntercept = true; }
}
Here's a simple Spring file, named spring-test-aspect.xml:
<beans xmlns="http://www.springframework.org/schema/beans"
       xmlns:xsi="http://www.w3.org/2001/XMLSchema-instance"
       xmlns:aop="http://www.springframework.org/schema/aop"
       xmlns:context="http://www.springframework.org/schema/context"
       xsi:schemaLocation="http://www.springframework.org/schema/aop
       http://www.springframework.org/schema/aop/spring-aop-3.0.xsd
       http://www.springframework.org/schema/beans
       http://www.springframework.org/schema/beans/spring-beans.xsd
       http://www.springframework.org/schema/context
       http://www.springframework.org/schema/context/spring-context.xsd">

    <context:annotation-config/>
    <context:component-scan base-package="com.mybiz"/>

    <aop:aspectj-autoproxy/>

</beans>
The aspect will automatically get Spring-managed since it uses the @Component annotation, and component scanning declared above includes its package. Use the same approach with your application object:
package com.mybiz;
@Component
public class MyApp
{
    public void myMethod() {}
}
Filling in the method is irrelevant; all we're trying to do is prove that if that method is invoked, that the aspect will intercept the control flow afterwards. Here's a test case that does this for us:
package com.mybiz;

@ContextConfiguration(locations ={"file:spring-test-aspect.xml"})
public class MyAspectTest extends AbstractTestNGSpringContextTests
{
    @Resource
    private MyAspect myAspect;

    @Resource
    private MyApp myApp;

    @PostConstruct
    public void init() { assert myAspect != null; assert myApp != null; }

    @Test
    public void confirmInterception()
    {
        assert !myAspect.intercepted();
        myApp.myMethod();
        assert myAspect.intercepted();
    }
}
There's the proof-of-concept; from here, you'd add real functionality to your application class and decorate that functionality with the aspect. I should offer a fair warning: the above snippets have not been actually compiled and run, rather simply copy-pasted with various names changed to be more general purpose (as such, it might not be totally correct). So, if you bump into any problems - you have my apologies, but I'm sure the problems will be trivial.
Subscribe to:
Posts (Atom)


